The Ultimate Guide to Layered Butterfly SVGs: Transforming Digital Designs into 3D Masterpieces
In the vibrant world of digital crafting, few designs capture the imagination quite like the butterfly. A symbol of transformation, beauty, and delicate strength, butterflies are a staple in scrapbooking, card making, home decor, and fashion design. However, taking a simple two-dimensional image and turning it into a stunning piece of art requires more than just cutting out a single shape. This is where the Layered Butterfly SVG comes into play. By utilizing multi-layered vector files, crafters can create intricate, three-dimensional effects that add depth, shadow, and realism to their projects. Whether you are a seasoned pro with a Cricut or Silhouette machine or a beginner eager to explore digital cutting software, understanding how to use these layered designs is a crucial skill for elevating your creative output.
What Exactly Is a Layered Butterfly SVG?
To understand the power of this digital asset, we must first break down what an SVG file actually is. SVG stands for Scalable Vector Graphics. Unlike standard image formats like JPG or PNG, which are made up of pixels, SVGs are mathematical equations that define shapes. This means they can be scaled to any size without losing quality—perfect for everything from a tiny sticker to a large wall decal.
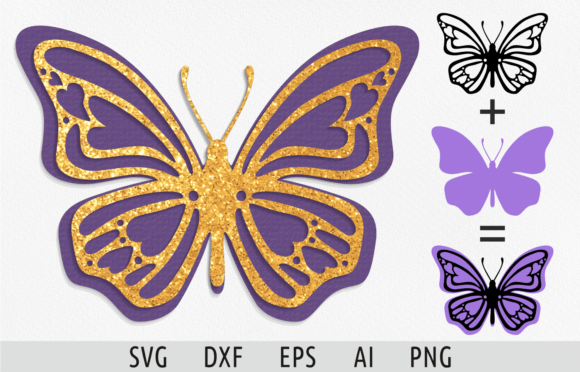
A Layered Butterfly SVG takes this concept further. Instead of a single outline of a butterfly wing, the design is broken down into multiple distinct layers. Each layer represents a different part of the butterfly’s anatomy or a specific color segment. When cut individually and assembled correctly, these layers overlap to create a faux-3D effect. This technique mimics the natural structure of real butterfly wings, which often have overlapping veins and segmented colors, resulting in a design that pops off the page.
The File Format Advantage
The versatility of the Layered Butterfly package lies in its comprehensive file inclusion. While the primary focus is on the SVG format, high-quality digital product bundles typically include a variety of other essential formats to ensure compatibility across different devices and software platforms:
- SVG Files: The core format for most modern cutting machines, allowing for precise editing of individual layers.
- EPS and AI Files: Essential for professional graphic designers using Adobe Illustrator or CorelDRAW, offering editable vector paths.
- DXF Files: Often used by older versions of cutting software or specific engineering applications, ensuring broad compatibility.
- PDF Files: Useful for printing directly or viewing the design layout before cutting.
- PNG and JPG Files (300dpi): High-resolution raster images provided for reference, sublimation printing, or use in non-cutting software. The transparent background in PNGs makes them particularly useful for digital planners and overlays.
Why Choose a 3D Butterfly Design Over a Standard Cut?
One might ask, why go through the trouble of cutting multiple layers when a single solid shape would suffice? The answer lies in visual impact and artistic expression. A standard single-layer butterfly is flat. While charming, it lacks dimension. A layered butterfly, however, introduces shadows and highlights naturally through the physical stacking of materials.
Consider the difference between a photograph and a painting. A photo captures light as it hits a surface, while a painting uses brushstrokes to create texture and depth. Similarly, a layered SVG allows you to "paint" with paper, fabric, or vinyl. By choosing contrasting colors for the inner and outer layers—for example, a dark navy base with bright yellow accents—you create a focal point that draws the eye. This technique is especially effective in:
- Greeting Cards: Adding a 3D butterfly to the front of a birthday or wedding card adds a tactile element that recipients love.
- Home Decor: Large layered butterflies can be mounted on walls using foam tape to create dramatic, shadow-box style art.
- Scrapbooking: Preserving memories becomes more engaging when embellishments have physical presence.
- Fashion and Accessories: Iron-on transfers of layered designs can add unique details to t-shirts, tote bags, and hats.
How to Use Your Layered Butterfly Files
Using a layered butterfly SVG is straightforward once you understand the workflow. Since this is a digital product, no physical item will be shipped. Instead, you receive a Zip archive containing all necessary files upon purchase. Here is a step-by-step guide to getting started:
Step 1: Download and Extract
After purchasing, download the Zip file to your computer. Right-click the archive and select "Extract All" or "Unzip." This will reveal the folder containing your SVG, EPS, DXF, and image files. It is good practice to keep these organized in a dedicated project folder.
Step 2: Import into Cutting Software
Open your preferred cutting software. Popular options include:
- Cricut Design Space: Ideal for Cricut users. Upload the SVG file, then use the "Slice" or "Weld" tools if needed to separate layers for individual cutting.
- Silhouette Studio: Great for Silhouette Cameo owners. The software handles complex layering well, allowing you to assign different colors to each layer easily.
- Sure Cuts A Lot (SCAL): Another robust option for managing vector graphics and preparing them for export to various cutting machines.
Step 3: Color Planning and Material Selection
Before cutting, plan your color scheme. The magic of the 3D effect relies on contrast. If you use the same shade of paper for every layer, the design will look flat even after assembly. Experiment with metallic papers, glitter cardstock, or translucent vellum for the top layers to let light shine through.
Step 4: Cutting
Load your material into the cutting mat. Ensure the blade depth is appropriate for the thickness of your paper or vinyl. Cut each layer separately. For best results, cut the largest background layer first, followed by the progressively smaller inner layers. This prevents accidental damage to underlying cuts.
Step 5: Assembly
This is where the creativity truly shines. You can assemble the butterfly using several methods:
- Glue Dots: Small adhesive dots placed between layers provide a clean bond and slight elevation.
- Double-Sided Foam Tape: Applying foam tape to the back of each layer creates significant height, enhancing the 3D illusion.
- Glue Sticks: Best for lightweight cardstock projects where minimal bulk is desired.
Start with the largest layer as your base. Carefully align the next layer on top, ensuring symmetry. Continue until all layers are stacked. For added stability, especially in larger designs, you can adhere the entire stack to a backing card before adding final embellishments.
Common Misconceptions About Digital Crafting
As digital crafting grows in popularity, several myths persist. One common assumption is that layered SVGs are difficult to use. In reality, once you master the basic upload and cut process, creating layered designs becomes second nature. Another misconception is that you need expensive equipment. While professional machines offer convenience, many layered designs can be adapted for hand-cutting using precision knives and templates derived from the PDF files included in your download.
Additionally, some beginners worry about file compatibility. The inclusion of multiple formats (SVG, DXF, EPS, AI) ensures that whether you are using the latest software version or an older system, you have access to the design. Always check the resolution of raster files (JPG/PNG) if you intend to print them; 300dpi at A4 size is generally sufficient for high-quality home printing.
Conclusion: Unleashing Your Creativity
The Layered Butterfly SVG is more than just a file; it is a gateway to exploring depth and dimension in your crafts. By leveraging the flexibility of vector graphics and the visual impact of multi-layered assembly, you can transform simple materials into sophisticated artworks. Whether you are designing for a personal gift, a small business venture, or simply enjoying a relaxing hobby, these digital assets provide the tools you need to bring your vision to life. Remember, the key to success lies in thoughtful color selection, precise cutting, and careful assembly. So, unzip your archive, load your software, and let your creativity take flight.